


Dungeons Guide:
Dungeons are timed adventures with changing rooms, enemies, chests, and resource nodes. Bring a Rift Orb, enter through a Midnight Cobblestone portal, and finish the assigned objective before time runs out. The timer and objective on your HUD tell you what to do during the run.
Your first dungeon:
Start with the tutorial if you want to practise safely. Prepare suitable gear and healing, get a Rift Orb, and read its description before entering. Inside, explore for loot while working toward the objective. Complete its final step in time, then leave with your dungeon trophy.
For making an orb at the Rift Crafter, see Custom Tables. This guide focuses on using the orb and completing your run.
Reading your Rift Orb:
Level: The orb stores your player level when its craft begins. This is the level used for the future dungeon; leveling up afterward does not change an orb already being crafted.
Theme: The environment for the run. An initially random theme is selected when the dungeon is created.
Objective: The task you must complete to win. The available objectives are Spirit Essence and Treasure Hunt. Read the HUD after entering for the exact requirements of that run.
Modifiers: Benefits, penalties, and special rules that affect the dungeon. A newly crafted orb can start with zero, one, or two random modifiers. Check the actual rules on the HUD once the run begins.
Remaining capacity: Space for more listed modifiers. An orb supports at most ten listed modifier slots.

Customizing your next run:
Before opening the portal, you can use the Focus Infuser to apply compatible Focuses, Relics, or Sigils to your orb. These can influence modifiers, objective, or theme. Focuses also bring drawbacks, so read the resulting orb before entering. See Custom Tables for the full crafting and customization instructions.
Preparing and entering:
Before you use the orb:
Set a Survival respawn point so you know where a returned Soul Totem should go if you die. Check your gear, leave inventory space for loot, and read the orb's level, theme, objective, and modifiers.
Natural health regeneration is disabled in dungeons. Bring permitted healing, such as a healing ability or a custom Alchemist brewable. Ordinary food alone is not a replacement for that plan.
Item type | Dungeon rule |
|---|---|
Custom Alchemist brewables | Permitted, with their own uses, recharge, and cooldown rules. |
Ordinary potions | Drinkable, splash, and lingering potions cannot be used. |
Other restricted items | Golden Apples, including enchanted ones, Ender Pearls, Chorus Fruit, and Milk Buckets cannot be used. |
The Caves template starts with 25 minutes before modifier effects. Your run can differ, so use the HUD timer rather than assuming every orb gives the same duration.
Building and activating the portal:
Build a closed rectangular frame from Midnight Cobblestone, leaving the middle open. The outside dimensions can be up to 7 blocks wide and 7 blocks tall; corners may be omitted. Hold a Rift Orb, right-click the frame, and walk into the filled opening to enter.

Healing and time management:
Brewables:
Custom Alchemist brewables are reusable healing drinks allowed in dungeons. Drinking spends a use, and dungeon mob kills provide recharge progress. Once you use one brewable during a run, other brewables are locked for that run. Check its description for remaining uses, cooldowns, and extra effects. See the Alchemist Shop guide for brewable tiers and upgrades.
Time Emblems:
A Time Emblem adds dungeon time in exchange for reduced maximum health. Uses have a 10-second cooldown. Consider both the extra time and the health you give up before using one.

Emblem | Time added | Maximum health reduction |
|---|---|---|
Dull | 5 seconds | 20% |
Rusted | 10 seconds | 23% |
Gilded | 20 seconds | 27% |
Verdant | 60 seconds | 31% |
Supreme | 120 seconds | 35% |
A Time Ring makes Time Emblems 50% more efficient. It does not grant 50% more starting time by itself. The Timecapped modifier disables Time Emblems and other time items for that run.
Dungeon objectives:
Rooms and points of interest can change between runs, even when the theme stays the same. Follow the HUD for the assigned objective, required items, and remaining time.
Objective | What to do and how to finish |
|---|---|
Spirit Essence | Kill eligible mobs, open eligible chests, and mine marked ores until the bar reaches 100/100. Contributions vary by run. Then find and right-click the Spirit Well. A full bar alone does not complete the dungeon. |
Treasure Hunt | Collect the exact named items and quantities shown on the HUD from enemies, chests, and custom ores. Hold a matching item and right-click the Treasure Altar. Repeat until every requirement has been submitted. |
Ordinary loot cannot replace a named Treasure Hunt item. Mining an unrelated ore does not substitute for an objective's marked ore. The tutorial gives you practice targets; normal runs have their own rooms, enemies, items, and amounts.
Combat, chests, and resource nodes:
Enemy patterns:
The starter Miner family introduces four useful combat patterns. Their challenge changes with the dungeon and its modifiers.
Enemy | What to expect |
|---|---|
Miner | Moves toward you and attacks at close range. Keep room to retreat. |
Miner Assassin | Hits harder; watch your health and avoid unnecessary trades. |
Ranged Miner | Attacks from a distance. Move around its shots before closing in. |
Miner Tank | Slower but tougher. Allow enough time and space to fight it. |
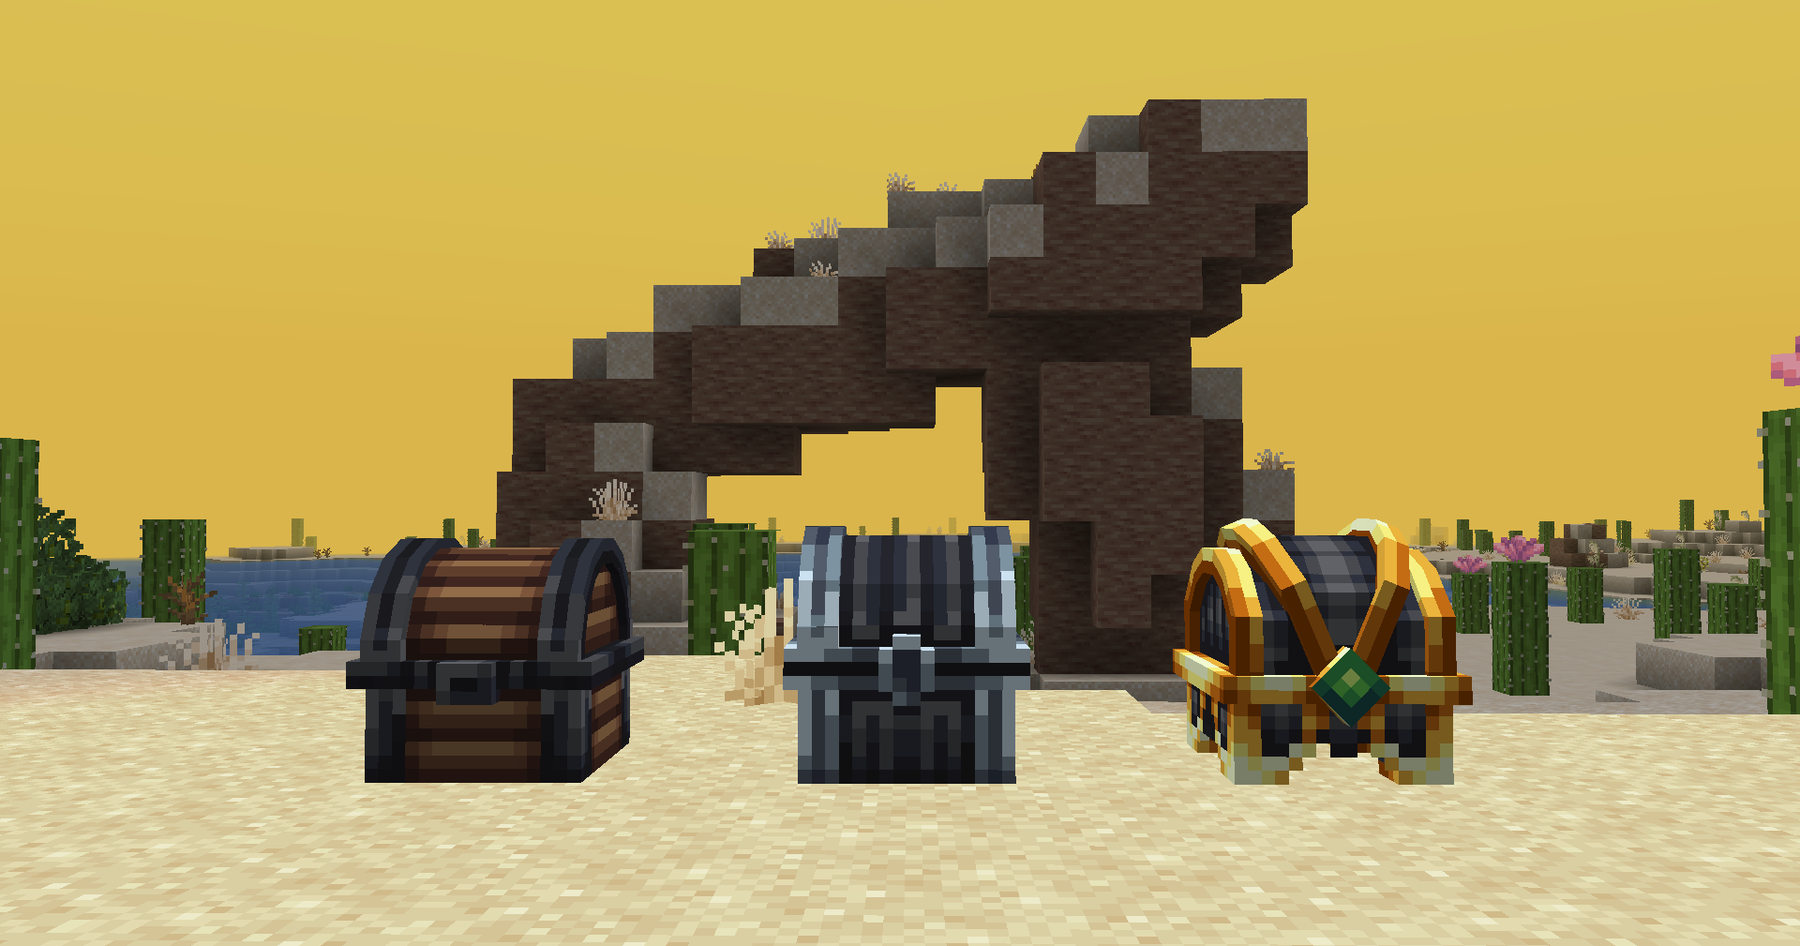
Chest types:
Wooden chests provide food and materials, with possibilities such as Scrap Metal, resin, Netherite Scrap, and Shulker Shells.
Armory chests can contain mystery equipment bags, Scrap Metal, runes, and crafting supplies. Opening a mystery bag reveals rolled equipment.
Ascension chests can contain Focus Fragments, Focuses, experience bottles, and resources. Relics and magnets are rarer possibilities.
These are possible kinds of loot, not guaranteed contents. Modifiers can change which chest types appear, loot quantity, rarity rolls, and trap frequency.
Custom ores and materials:
Dungeons contain ordinary ores and custom resource nodes. Which nodes appear depends on the dungeon. Named custom ingredients cannot be replaced with ordinary iron ingots or diamonds.
Standard ingots: Azurite, Brucite, Tennantite, Wulfenite, and Xenonite.
Standard gems: Corundum, Cuprite, Fluorite, and Ruby Feldspar.
Unique materials: Chromite, Chrysoberyl, Hematite, and Galithite Gems, plus Dioptase Ingots.
A standard resource node counts as one mining point and a unique node as five. Unique material entries have a 50% drop chance, and quantities vary. Follow the HUD for the actual in-run mining requirement; mining outside the dungeon does not complete it.
Raw variants also exist. Match the processed ingot or gem named by a recipe rather than treating raw and processed materials as interchangeable. These resources are used in custom recipes; see the Ores guide for more information.
Ore rolls can also supply Treasure Hunt items such as Ancient Sigils, Explorer Journals, Royal Sundials, Scepters, and Scrolls. These are objective items. Collect and submit the exact items requested on the HUD.
Dungeon modifiers
Modifiers change the rules of your run. Positive effects help you, negative effects make the run harder, and curses apply harmful status effects. Effects may come from the orb or be rolled when the dungeon is created. Check the orb description and dungeon HUD for the actual rules.
Modifiers are grouped by the effect they change, with related bonuses and penalties next to each other. The Type column identifies positive bonuses, negative penalties, and curses.
Modifier | Effect | Type |
|---|---|---|
Clockup | Starting time +2m 30s. | Positive |
Outlast | Starting time +5m. | Positive |
Eternal | Starting time +10m. | Positive |
Brief | Starting time −2m 30s. | Negative |
Hurried | Starting time −5m. | Negative |
Frantic | Starting time −10m. | Negative |
Timecapped | Disables Time Emblems and other time items. | Negative |
Durable | Equipment wear −30%. | Positive |
Armored | Equipment wear −60%. | Positive |
Indestructible | Equipment wear −100%. | Positive |
Breakable | Equipment wear +50%. | Negative |
Fragile | Equipment wear +100%. | Negative |
Shatterable | Equipment wear +200%. | Negative |
Relaxed | Dungeon difficulty −10. | Positive |
Casual | Dungeon difficulty −20. | Positive |
Gentle | Dungeon difficulty −30. | Positive |
Tough | Dungeon difficulty +10. | Negative |
Intense | Dungeon difficulty +20. | Negative |
Extreme | Dungeon difficulty +35. | Negative |
Isolated | Added mob count −2. | Positive |
Peaceful | Added mob count −4. | Positive |
Overrun | Added mob count +2. | Negative |
Chaotic | Added mob count +4. | Negative |
Horrific | Added mob count +6. | Negative |
Ferocious | Enemy damage +25%. | Negative |
Enraged | Enemy damage +50%. | Negative |
Frenzied | Increases enemy damage; also changes speed and health. | Negative |
Lucky | Rarity bonus +10%. | Positive |
Fortunate | Rarity bonus +20%. | Positive |
Blessed | Rarity bonus +30%. | Positive |
Unlucky | Rarity bonus −10%. | Negative |
Jinxed | Rarity bonus −30%. | Negative |
Ample | Item quantity +10%. | Positive |
Rich | Item quantity +15%. | Positive |
Abundant | Item quantity +25%. | Positive |
Barren | Item quantity −15%. | Negative |
Sparse | Item quantity −20%. | Negative |
Bountiful | Generated ore amounts ×2. | Positive |
Wealthy | Generated ore amounts ×3. | Positive |
Flooding | Generated ore amounts ×4. | Positive |
Focused | Increases the chance of Focus loot. | Positive |
Woody | Wooden chest selection bonus +25%. | Positive |
Timbered | Wooden chest selection bonus +50%. | Positive |
Geared | Armory chest selection bonus +25%. | Positive |
Armed | Armory chest selection bonus +50%. | Positive |
Shrine | Ascension chest selection bonus +25%. | Positive |
Temple | Ascension chest selection bonus +50%. | Positive |
Safehaven | Prevents chest traps. | Positive |
Trapflood | More frequent chest traps. | Negative |
Speedy | Speed I. | Positive |
Blazing | Speed II. | Positive |
Healing | Regeneration I. | Positive |
Regenerating | Regeneration II. | Positive |
Strong | Strength I. | Positive |
Colossal | Strength II. | Positive |
Weakened | Weakness I. | Curse |
Fractured | Weakness II. | Curse |
Peckish | Hunger I. | Curse |
Starving | Hunger II. | Curse |
Tired | Mining Fatigue I. | Curse |
Drained | Mining Fatigue II. | Curse |
Exhausting | Enemy hits: Mining Fatigue I. | Negative |
Burdened | Slowness I. | Curse |
Restrained | Slowness II. | Curse |
Bindstrike | Enemy hits: Slowness II. | Negative |
Withering | Enemy hits: Wither I. | Negative |
Poisonous | Enemy hits: Poison I. | Negative |
Sluggish | Reduces cooldown reduction. | Negative |
Defenseless | Reduces resistance. | Negative |
Resurrection | Afterlife: preserves items on death. | Positive |
Sealed | Disables the early exit portal. | Negative |
Chest-selection and rarity bonuses change the relevant rolls; they do not guarantee a particular chest or reward.
Withering, Poisonous, Exhausting, and Bindstrike each have a 50% chance to apply their listed effect on an enemy hit. The effect lasts 15 seconds.
Modifiers can stack, while incompatible combinations are filtered when the run is generated. Difficulty and rarity values interact with the other scaling rules of the dungeon.
Finishing, leaving, and recovering items:
Winning and your dungeon trophy:
Complete the assigned objective before time expires, then leave the dungeon. You receive a dungeon trophy containing your completion rewards. Its rewards are determined by the completed run, including the dungeon level, modifiers, performance, and time remaining. The reward selection is stored in the trophy when it is created; waiting to open it does not reroll those rewards.
Right-click the trophy to redeem it and receive its stored rewards. Make room in your inventory first. Redeeming consumes the trophy. Possible rewards include coins, player-level experience, Soul Flames, equipment, trinkets, and materials. Loot you picked up during the run is separate from the trophy's completion rewards.
You do not have to redeem it immediately. You can keep the unopened trophy or trade or sell it to another player instead. The rewards stay attached to that trophy.
Leaving early or running out of time:
The exit portal lets you leave early, but leaving ends your participation and you cannot rejoin the same dungeon. Disconnecting also ends participation. If time expires before completion, the run ends in defeat. A Sealed run disables the early exit portal.
Death and Soul Totems:
On a normal dungeon death, your carried items are stored in a Soul Totem. The Afterlife condition preserves items instead; the Resurrection modifier enables that condition. Check the run's rules before assuming your equipment is safe.
A returned totem goes to your saved Survival respawn point, or world spawn if none is set. Take the totem to the Gravekeeper at the Graveyard. Give them the totem, check the recovery price, and pay to get your stored items back. Make enough space in your inventory before recovering them. See the Gravekeeper guide for the recovery service.
Practice and quick help:
Useful commands:
- opens tutorial controls so you can practise before a real run.
- ends your practice session and runs its cleanup.
- opens the player guide on Hub Master.
If something seems wrong:
The Spirit Essence bar is full, but the dungeon has not ended: Find and right-click the Spirit Well. Filling the bar is only the collection step.
The Treasure Altar will not accept an item: Match the exact item and quantity shown on the HUD, hold a matching item, and submit it at the altar.
The portal will not activate: Check the Midnight Cobblestone frame, its open middle, and outside dimensions no larger than 7 × 7. Hold the orb when right-clicking.
A Time Emblem does not work: Check for Timecapped and the ten-second cooldown.
You cannot use a second brewable: Using one brewable locks the other brewables for that run.
Items are missing after death: Look for the returned Soul Totem at your Survival respawn point or world spawn, then take it to the Gravekeeper.
You need to leave private practice: Use to end it cleanly.

